
If you’ve used Vue.js, you probably have run across two framework features that can be confusing to distinguish: computed properties and watchers. In this article, I will compare and contrast computed props vs. watchers, as well as discuss when one is preferred over the other. First, let’s remind ourselves how Vue.js’s reactivity system works.
Reacting to changes in Vue.js
Vue, like many modern frontend frameworks, utilizes a virtual DOM for UI updates. While virtual DOMs as an architectural pattern are outside the scope of this article, it is important to understand how the virtual DOM influences or builds on other features of the Vue framework (like computed props and watchers). Speaking generally (each framework’s implementation is of course different), a virtual DOM is a way to represent the tree structure of an HTML Document in code as a Javascript singleton object. Each node in the HTML document becomes another instance on this JavaScript object, including all the state values reference in that node.
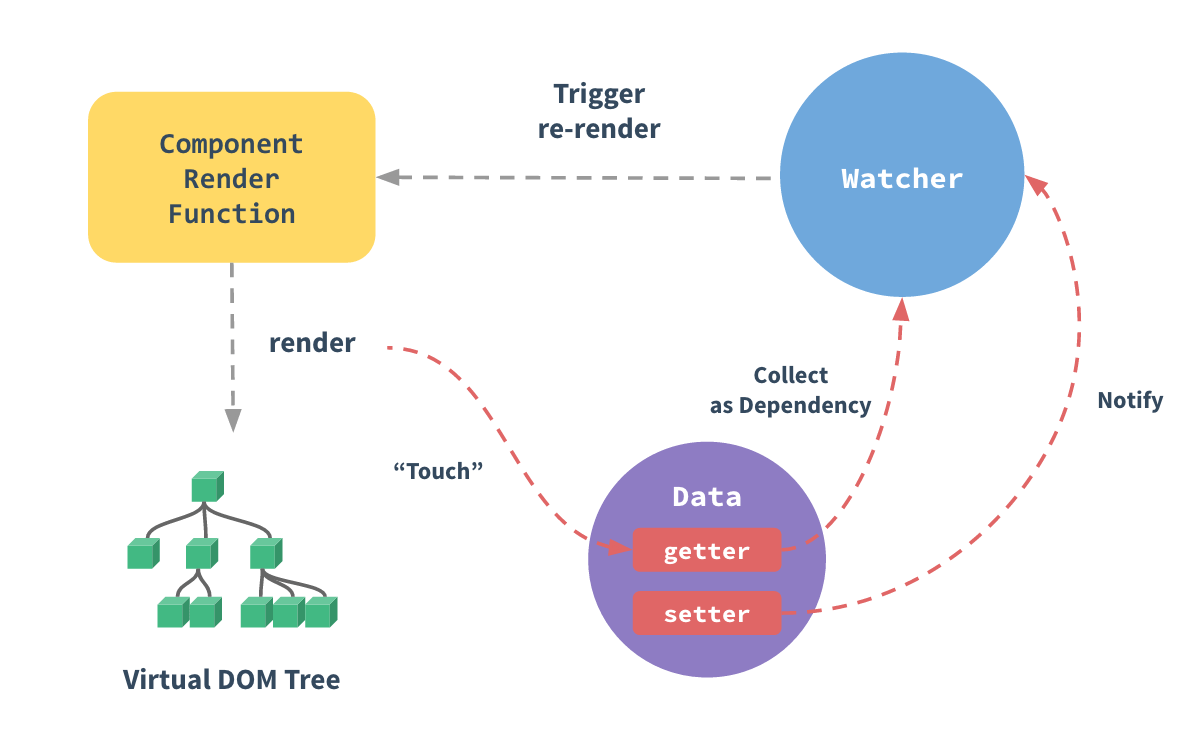 Image from Vue.js docs on Reactivity. Source: “How Changes are Tracked”
When our state changes in the parent node, this forces us to traverse this virtual representation of the HTML DOM hierarchy and apply state changes where needed. Once this virtual DOM has been updated and all nodes have re-calculated their values in JavaScript, the real DOM is then updated and re-drawn. This limits our re-paints and re-draws, which is computationally one of the most expensive operations a browser can do.
So how does the virtual DOM in Vue.js know when something has changed? Enter Watchers.
Watchers

Different kind of Watcher 😉. source
Watchers are Vue’s built-in way for tracking changes across the the application. When the virtual DOM is created at app/component bootstrap, watchers are added to each Node to track the changes inside. When state changes are detected, this schedules a UI update to be completed once the virtual DOM has finished all of it’s re-calculations across all Nodes.
But watchers can also be created manually in Vue components to react to changes in any state the component tracks internally. We will look at examples of watchers and computed props next.
Watchers in Components
Let’s say we have the following basic Vue component:
<template>
    <div>
        <!--- Renders a value from it's internal state --->
        {{ someInternalStateValue }}
    </div>
</template>

<script>
export default {
    name: 'ExampleComponent',
    props: {
        // Is passed a single prop
        someExternalStateValue: {
            type: Number,
            default: 0,
        },
    },
    data:() => ({
        // Our internal state
        someInternalStateValue: false,
    });
}
</script>
Now, let’s say we wanted to render true when the value of the prop someExternalStateValue is greater than 10 and false when the value of the prop is less than 10. One way we could do this is by creating a watcher to react the changes to the passed in prop:
<template>
    <div>
        <!--- Renders a value from it's internal state --->
        {{ someInternalStateValue }}
    </div>
</template>

<script>
export default {
    name: 'ExampleComponent',
    props: {
        // Is passed a single prop
        someExternalStateValue: {
            type: Number,
            default: 0,
        },
    },
    data:() => ({
        // Our internal state
        someInternalStateValue: false,
    }),
    // Adding the property 'watch' to manually watch for changes to any defined state properties
    watch: {
        //Add a handler named after the prop defined on this Vue instance you want to watch
        someExternalStateValue(newValue, oldValue) {
            // watch handlers are always passed newValue and oldValue as params.
            if (newValue > 10) {
                this.someInternalStateValue = true;
            } else {
                this.someInternalStateValue = false;
            }
        }
    }
}
</script>
In the solution above, you can see it’s a simple matter of defining the watch property on the component and then adding a handler with the name of the property you want to watch for changes on. In my example above, you can see my handler just sets a value on my component’s internal state, which would then render the correct value after the next re-paint. Easy right? So we should use watchers everywhere?

Computed Props
So now let’s see what the solution looks like using a computed prop:
<template>
    <div>
        <!--- Renders a value from it's internal state --->
        {{ someInternalStateValue }}
    </div>
</template>

<script>
export default {
    name: 'ExampleComponent',
    props: {
        // Is passed a single prop
        someExternalStateValue: {
            type: Number,
            default: 0,
        },
    },
    computed: {
        // Computed props must return a value.
        someInternalStateValue() {
            return this.someExternalStateValue > 10;
        },
    },
}
</script>
Switching from a watcher to a computed prop has simplified our component quite a bit. One of the immediate benefits of a computed prop is readability. We can use a simple return statement from our computed prop to achieve what required both internal an state variable and a method to maintain that state. These are both fairly simple examples, so let’s look at a more complex example that involves watching multiple values to really see the benefits of computed props.
Reacting to Multiple Properties Changed
Now let’s take a look at an updated component. If you look close, we now have a second prop being passed in, creatively named someOtherExternalStateValue. Our business rules have also changed! Now, we only want to show true when both someExternalStateValue and someOtherExternalStateValue are greater than 10.
<template>
    <div>
        <!--- Renders a value from it's internal state --->
        {{ someInternalStateValue }}
    </div>
</template>

<script>
export default {
    name: 'ExampleComponent',
    props: {
        someExternalStateValue: {
            type: Number,
            default: 0,
        },
        someOtherExternalStateValue: {
            type: Number,
            default: 0,
        },
    },
    data:() => ({
        // Our internal state
        someInternalStateValue: false,
    });
}
</script>
Here is what this example looks like with watchers:
<template>
    <div>
        <!--- Renders a value from it's internal state --->
        {{ someInternalStateValue }}
    </div>
</template>

<script>
export default {
    name: 'ExampleComponent',
    props: {
        someExternalStateValue: {
            type: Number,
            default: 0,
        },
        someOtherExternalStateValue: {
            type: Number,
            default: 0,
        },
    data:() => ({
        // Our internal state
        someInternalStateValue: false,
    }),
    watch: {
        someExternalStateValue(newValue, oldValue) {
            if (newValue > 10 && this.someOtherExternalStateValue > 10) {
                this.someInternalStateValue = true;
            } else {
                this.someInternalStateValue = false;
            }
        }
        someOtherExternalStateValue(newValue, oldValue) {
            if (newValue > 10 && this.someExternalStateValue > 10) {
                this.someInternalStateValue = true;
            } else {
                this.someInternalStateValue = false;
            }
        }
    }
}
</script>
While this solution works, it has drawbacks. First, it requires defining handlers for each value we need to track when reacting to changes. This makes our component harder to read and test, especially as the number of tracked objects grows in a component. It also could create unintentional recursive calls if one watcher were to change a value in another watcher. Now let’s see what this looks like when using a computed prop:
<template>
    <div>
        <!--- Renders a value from it's internal state --->
        {{ someInternalStateValue }}
    </div>
</template>

<script>
export default {
    name: 'ExampleComponent',
    props: {
        someExternalStateValue: {
            type: Number,
            default: 0,
        },
        someOtherExternalStateValue: {
            type: Number,
            default: 0,
        },
    computed: {
        someInternalStateValue() {
            return this.someExternalStateValue > 10
                && this.someOtherExternalStateValue > 10;
        }
    }
}
</script>
Switching our solution to a computed prop, you can immediately see the benefits. First, we don’t need to manually add any watchers or additional supporting handlers methods or state. All we need to do is define a computed property that has references to the values we are concerned with.
Now when either someExternalStateValue or someOtherExternalStateValue changes, the computed prop handler will re-calculate it’s return value the next time it is accessed/referenced.
A nice benefit of computed props is that Vue caches the return value, only re-executing the method when a referenced value within it changes. If your computed prop has complex logic or if you use a large number of computed props in your component, this could have considerable performance benefits.
Summary
Computed props and watchers are both powerful tools in the Vue.js toolbox, but it can be confusing to know when to use one or another. The general rule of thumb I use:
Computed props are for tracking any state or value that has an end result that is dependent upon another state or value.
Watchers are for when you need to react to state changes, but not necessarily to update state. Think “Send a notification when something happens”.


?file=Uatu_%2528Earth-616%2529_from_Original_Sin_Vol_1_1_001.jpg)